Sunday, November 14, 2010

ASUS G51Jx 3D


ASUS G51Jx 3D
Intel 720 QM ( i7 1.6 - 2.8 Ghz ) / 15.6 FHD Color Shine (LED) / Nvidia GTX 360M 1 GB DDR3 / 4 GB DDR3 / 640 GB / DVD Super Multi / Wifi 802.11 a/g/n / Bluetooth / Camera 2 Mpx / 4 USB / Firewire IEEE 1394 / HDMI / E-SATA / Express Card / Cardreader 8-in-1 / Battery 6 cells Li-ion / Weight 3.3 Kg / Windows 7 Premium / "illuminated Gaming Keyboard / Altec Lansing Speaker / Lower Keyboard Area with back light / Express Gate / Soft Touch Palm Rest

US$ 1989

ASUS G51Jx


ASUS G51Jx
Intel 720 QM ( i7 1.6 - 2.8 Ghz ) / 15.6 FHD Color Shine (LED) / Nvidia GTX 360M 1 GB DDR3 / 4 GB DDR3 / 500 GB / DVD Super Multi / Wifi 802.11 a/g/n / Bluetooth / Camera 2 Mpx / 4 USB / Firewire IEEE 1394 / HDMI / E-SATA / Express Card / Cardreader 8-in-1 / Battery 6 cells Li-ion / Weight 3.3 Kg / Windows 7 Premium / "illuminated Gaming Keyboard / Altec Lansing Speaker / Lower Keyboard Area with back light / Express Gate / GTX Level Graphic Engine

US$ 1829

ASUS UL80VT


ASUS UL80VT
Intel? Core? 2 Duo Processor ULV SU7300 ( 1.3GHz,3 MB L2 cache, 800MHz FSB ) / 13.3 HD Color Shine (LED) / Nvidia G210M 512 MB DDR3 / 4 GB DDR3 / 500 GB / 9.5" mm 8x Super Multi DL / wifi 802.11 / Bluetooth / Camera 1.3 Mpx / 3 USB / HDMI / Cardreader 4 in 1 / Battery 8 cells , Up to 12 hours / Weight 2 Kg / Less than 1" thickness / Windows 7 Premium / Express Gate / Multi Touchpad / Altec Lansing Speaker / Chiclet Keyboard / Ice Cool Design

US$ 959

ASUS A42JR


ASUS A42JR
Intel Core i5 - 430M ( 2.26Ghz with Turbo Boost up to 2.53 Ghz ) / 14 HD Color Shine (LED) / ATI HD 5470 1 GB DDR3 / 4 GB DDR3 / 500 GB HDD / DVD Super Multi / Wifi 802.11 b/g/n / Bluetooth / HDMI / Camera 1.3 Mpx / 3 USB / Cardreader 4 in 1 / BAttery 6 cells / 2.36 Kg / Windows 7 Premium / Palm Proof Technology / Smart LogOn / Chiclet Keyboard / SRS Surround Sound with Altech Lansing Speaker

US$ 975

ASUS U80V


ASUS U80V
Intel T6570 ( 2 Ghz ) / 14" HD Color Shine SLIM (LED) / ATI HD 4570 512 MB / 2 GB / 250 GB / DVD Super Multi / 802.11 b/g/n / Bluetooth / 1.3 Mpx / 3 USB / HDMI / Express Card 4-in-1 / 6 cells, Up to 6 hours / 2.15 Kg / Windows 7 Premium / Animated Lighting Touch-Pad, Lighting Keyboard, Auto Brightness Light Sensor / Altec Lansing Speaker

US$ 819

ASUS UL30VT


ASUS UL30VT
Intel? Core? 2 Duo Processor ULV SU7300 ( 1.3GHz,3 MB L2 cache, 800MHz FSB ) / 13.3 HD Color Shine (LED) / Nvidia G210M 512 MB DDR3 / 2 GB DDR3 / 500 GB / wifi 802.11 / Bluetooth / Camera 0.3 Mpx / 3 USB / HDMI / Cardreader 4 in 1 / Battery 8 cells , Up to 12 hours / Weight 1.7 Kg / Less than 1" thickness / Windows 7 Premium / Express Gate / Multi Touchpad / Altec Lansing Speaker / Chiclet Keyboard / Ice Cool Design

US$ 819

ASUS A42JR


ASUS A42JR
Intel Core i3 - 350M ( 2.26Ghz with Turbo Boost up to 2.53 Ghz ) / 14 HD Color Shine (LED) / ATI HD 5470 1 GB DDR3 / 2 GB DDR3 / 320 GB HDD / DVD Super Multi / Wifi 802.11 b/g/n / Bluetooth / HDMI / Camera 1.3 Mpx / 3 USB / Cardreader 4 in 1 / BAttery 6 cells / 2.36 Kg / DOS / Palm Proof Technology / Smart LogOn / Chiclet Keyboard / SRS Surround Sound with Altech Lansing Speaker

US$ 699

ASUS A42F


ASUS A42F
Intel Core i3 - 350M ( 2.26Ghz with Turbo Boost up to 2.53 Ghz ) / 14 HD Color Shine (LED) / Intel GMA 4500 MHD / 1 GB DDR3 / 500 GB HDD / DVD Super Multi / Wifi 802.11 b/g/n / Bluetooth / Camera 1.3 Mpx / 3 USB / Cardreader 4 in 1 / BAttery 6 cells / 2.36 Kg / DOS / Palm Proof Technology / Smart LogOn / Chiclet Keyboard / SRS Surround Sound with Altech Lansing Speaker

US$ 619

ASUS K40IE - VX005D


ASUS K40IE - VX005D
Intel Dual Core T4400 (2.2 Ghz) / 14" HD Color Shine (LED) / Nvidia G102M 512 MB / 2 GB DDR3 / 320 GB /DVD Super Multi / Wifi / 802.11 b/g/n / camera 1.3 Mpx / 4 USB / Card reader 4 in 1 / Bluetooth / HDMI / Battery 6 cells / Weight 2.36 Kg / DOS / Ice Cool Design / SRS Surround sound Enjoyment with Altec Lansing Speaker

US$ 589

ASUS K40IN - VX170


ASUS K40IN - VX170
Intel Dual Core T4400 (2.2 Ghz) / 14" HD Color Shine (LED) / Nvidia G102M 512 MB / 2 GB DDR2 / 320 GB /DVD Super Multi / Wifi / 802.11 b/g/n / camera 1.3 Mpx / 4 USB / Card reader 4 in 1 / Battery 6 cells / Weight 2.36 Kg / DOS / Ice Cool Design / SRS Surround sound Enjoyment with Altec Lansing Speaker

US$ 579

ASUS K40IJ - VX146


ASUS K40IJ - VX146
Intel Dual Core T4400 (2.2 Ghz) / 14" HD Color Shine (LED) / Intel GMA 4500 MHD / 2 GB DDR2 / 320 GB /DVD Super Multi / Wifi / 802.11 b/g/n / camera 1.3 Mpx / 4 USB / Card reader 4 in 1 / Battery 6 cells / Weight 2.36 Kg / DOS / Ice Cool Design / SRS Surround sound Enjoyment with Altec Lansing Speaker

US$ 499

ASUS eeePC 1005 P


ASUS eeePC 1005 P
Intel? Atom N450 ( 1.66 Ghz ) / 10 LED WSVGA Glare / Intel 945 GSM / 1 GB / Intel UMA / 250 GB / Wifi Integrated 802.11 b/g/n / 0.3M pixel Web camera / 4 in 1 Card Reader / 3xUSB / VGA-out (D-Sub, 15pin) / Head-0ut / Mic-In / LAN 10/100 Mbits / RJ45 / Wide Multi-Touchpad / Windows 7 Starter / Battery 6 cells 8.5 hrs / Weight 1.27 kg / Color : Black , White , Blue , Pink

US$ 399

ASUS eeePC 1001 P


ASUS eeePC 1001 P
Intel? Atom N450 ( 1.66 Ghz ) / 10 LED WSVGA Glare / Intel 945 GSM / 1 GB / Intel UMA / 160 GB / Wifi Integrated 802.11 b/g/n / 0.3M pixel Web camera / 4 in 1 Card Reader / 3xUSB / VGA-out (D-Sub, 15pin) / Head-0ut / Mic-In / LAN 10/100 Mbits / RJ45 / Wide Multi-Touchpad / DOS / Battery 6 cells 8.5 hrs / Weight 1.27 kg / Color : Black , White

US$ 309

Axioo Zetta MMT.2.622 (3G)


Axioo Zetta MMT.2.622 (3G)
Intel Core2Duo SU9600 (1.6 Ghz) / 2 GB DDR2 SDRAM PC-6400 / Intel GMA 4500M 220 MB (shared) / 13.3" WXGA TFT 1366 x 768 / 120 GB HDD / LAN 10/100/1000 Mbps / Intel Wireless 5100AGN / 1x USB 2.0 / VGA / UV FINISH / Audio / 3G / Webcamera / Windows 7 Home Premium / Weight : 1.5 kg

Rp. 11.499.000,0

Axioo Zetta MMT.2.622


Axioo Zetta MMT.2.622
Intel Core2Duo SU9600 (1.6 Ghz) / 2 GB DDR2 SDRAM PC-6400 / Intel GMA 4500M 220 MB (shared) / 13.3" WXGA TFT 1366 x 768 / 120 GB HDD / LAN 10/100/1000 Mbps / Intel Wireless 5100AGN / 1x USB 2.0 / VGA / UV FINISH / Audio / Webcamera / Windows 7 Home Premium / Weight : 1.5 kg

Rp. 10.799.000,0

Axioo Zetta MMT.P.332


Axioo Zetta MMT.P.332
Intel Core2Solo SU2700 (1.3 GHz, FSB 800, Cache 2 MB) / 3 GB DDR2 SDRAM PC-6400 / Intel GMA 4500M 220 MB (shared) / 13.3" WXGA TFT 1366 x 768 / 120 GB HDD / LAN 10/100/1000 Mbps / Intel Wireless 5100AGN / 1x USB 2.0 / VGA / Audio / Webcamera / Windows 7 Home Premium / Weight : 1.5 kg

Rp. 8.999.000,0

Axioo Zetta MMI.2.320


Axioo Zetta MMI.2.320
Intel Core2Duo SU7300 (1.3 GHz, FSB 800, Cache 2 MB) / 2 GB DDR2 SDRAM PC-6400 / Intel GMA x4500 up to 256Mb VRAM / 13.3" WXGA TFT 1366 x 768 / 500 GB HDD / LAN 10/100/1000 Mbps / Intel Wireless 5100AGN / 1x USB 2.0 / VGA / Audio / Webcamera / Fingerprint Reader / Windows 7 Home Premium

Rp. 7.999.000,0

Axioo Zetta MMI.2.320 (NON OS)


Axioo Zetta MMI.2.320 (Non OS)
Intel Core2Duo SU7300 (1.3 GHz, FSB 800, Cache 2 MB) / 2 GB DDR2 SDRAM PC-6400 / Intel GMA x4500 up to 256Mb VRAM / 13.3" WXGA TFT 1366 x 768 / 500 GB HDD / LAN 10/100/1000 Mbps / Intel Wireless 5100AGN / 1x USB 2.0 / VGA / Audio / Webcamera / Fingerprint Reader

Rp. 7.000.000,0

Axioo Zetta MLM2 422


Axioo Zetta MLM2 422
Intel Core2Duo T8300 (2.4 Ghz), FSB 800Mhz, 3Mb L2C / 2Gb PC-5300 / 320Gb SATA / DVD-RW / 12.1" TFT WXGA 1280x800 / Intel GMA x4500 up to 256Mb VRAM / Express card 54/34/ Fast Ethernet 10/100 / V.90/56K Fax/Modem V.92 / Wireless 802.11bg / Webcam Integrated 2.0Mpx / 7-in-1 Card Reader / Linux OS / 8-cell battery / UV Finish / Silver Chassis

Rp. 6.799.000,0

Axioo Neon MLC4122


Axioo Neon MLC4122
Intel Pentium Core 2 Duo T7700 2.4Ghz / 1 GB DDR2 / HDD 320Gb / DVD-RW / 12.1" TFT WXGA / DVD-RW / SiS Mirage 3+ up to 256Mb VRAM / Express card 54/34 / Fast Ethernet 10/100 / V.90/56K Fax/Modem V.92 / Wireless 802.11bg / Webcam 1.3Mpx / 7-in-1 Card Reader / Available Color : Black, Dark Grey, Red, Blue

Rp. 6.149.000,0

Axioo Neon MLC2222


Axioo Neon MLC2222
Intel Pentium Core 2 Duo T6600 (2.2 Ghz) / 2 GB / HDD 320Gb / DVD-RW / 12.1" TFT WXGA / DVD-RW / SiS Mirage 3+ up to 256Mb VRAM / Express card 54/34 / Fast Ethernet 10/100 / V.90/56K Fax/Modem V.92 / Wireless 802.11bg / Webcam 1.3Mpx / 7-in-1 Card Reader / Windows 7 Home Premium / Available Color : Black, Dark Grey, Red, Blue

Rp. 6.899.000,0

Axioo Neon MLC2122


Axioo Neon MLC2122
Intel Pentium Core 2 Duo T6600 (2.2 Ghz) / 1 GB / HDD 320Gb / DVD-RW / 12.1" TFT WXGA / DVD-RW / SiS Mirage 3+ up to 256Mb VRAM / Express card 54/34 / Fast Ethernet 10/100 / V.90/56K Fax/Modem V.92 / Wireless 802.11bg / Webcam 1.3Mpx / 7-in-1 Card Reader / Available Color : Black, Dark Grey, Red, Blue

Rp. 5.849.000,0

Axioo Neon MLC312P


Axioo Neon MLC312P
Intel Pentium Dual Core T4500 (2.3 Ghz) / 1 GB / HDD 320Gb / DVD-RW / 12.1" TFT WXGA / DVD-RW / SiS Mirage 3+ up to 256Mb VRAM / Express card 54/34 / Fast Ethernet 10/100 / V.90/56K Fax/Modem V.92 / Wireless 802.11bg / Webcam 1.3Mpx / 7-in-1 Card Reader / Available Color : Black; Dark Grey; Red; Blue

Rp. 5.199.000,0

Axioo Zetta MKU.P.312


Axioo Zetta MKU.P.312
Intel Pentium SU4100 (1.3 Ghz) / 1GB DDR2 / 320GB HDD / NIC, WiFi / Intel GMA 4500 / Camera / 11.6" WXGA / Non OS

Rp. 5.399.000,0

Axioo Pico DHN618


Axioo Pico DHN618 (XP Home)
Intel Atom N280 1.66Ghz (512Kb L2C, 533Mhz FSB) / / 1GB DDR2 / 8GB SSD / NIC / WiFi / VGA Intel GMA950 64MB (shared) / Camera / 8" WVGA / Win XP Home

Rp. 4.699.000,0

Axioo Neon MNC1122


Axioo Neon MNC1122
Intel Pentium Core 2 Duo T6570 (2.1 Ghz) / 1 GB / HDD 320Gb / DVD-RW / 14.1" TFT WXGA / DVD-RW / SiS Mirage 3+ up to 256Mb VRAM / Express card 54/34 / Fast Ethernet 10/100 / V.90/56K Fax/Modem V.92 / Wireless 802.11bg / Webcam 1.3Mpx / 7-in-1 Card Reader / Available Color : Black; Dark Grey

Rp. 4.599.000,0

Axioo Neon MNC325P


Axioo Neon MNC325P
Intel Pentium Dual Core T4500 (2.3 Ghz) / 2 GB / HDD 250Gb / DVD-RW / 14.1" TFT WXGA / DVD-RW SiS Mirage 3+ up to 256Mb VRAM / Express card 54/34 / Fast Ethernet 10/100 / V.90/56K Fax/Modem V.92 / Wireless 802.11bg / Webcam 1.3Mpx / 7-in-1 Card Reader / Windows 7 Starter EM / Available Color : Black; Dark Grey

Rp. 4.949.000,0

Axioo Neon MNC315P


Axioo Neon MNC315P
Intel Pentium Dual Core T4500 (2.3 Ghz) / 1 GB / HDD 250Gb / DVD-RW / 14.1" TFT WXGA / DVD-RW / SiS Mirage 3+ up to 256Mb VRAM / Express card 54/34 / Fast Ethernet 10/100 / V.90/56K Fax/Modem V.92 / Wireless 802.11bg / Webcam 1.3Mpx / 7-in-1 Card Reader / Available Color : Black; Dark Grey

Rp. 4.399.000,0

Axioo Neon MNC915C


Axioo Neon MNC915C
Intel Celeron T3100 1.9 Ghz Dual Core / 1 GB / HDD 250Gb / DVD-RW / 14.1" TFT WXGA / DVD-RW / SiS Mirage 3+ up to 256Mb VRAM / Express card 54/34 / Fast Ethernet 10/100 / V.90/56K Fax/Modem V.92 / Wireless 802.11bg / Webcam 1.3Mpx / 7-in-1 Card Reader / Available Color : Black; Dark Grey

Rp. 3.999.000,0

Axioo Pico DJV715


Axioo Pico DJV715
Intel Atom N280 1.66Ghz (512Kb L2C, 533Mhz FSB) / 1GB PC-5300 (max 2Gb, 1 slot) / HDD 250GB SATA / 10.2" WXGA 1024x600 / Intel 950GM up to 64Mb VRAM / Fast Ethernet 10/100 / Wireless 802.11bg / Webcam 1.3Mpx / 3-in-1 Card Reader / / Weight 1.2kg with 6-cell battery

Rp 2.599.000,0

Axioo Pico DJV712


Axioo Pico DJV712 (Windows 7 Starter EM)
Intel Atom N280 1.66Ghz (512Kb L2C, 533Mhz FSB) / 1GB PC-5300 (max 2Gb, 1 slot) / HDD 320GB SATA / 10.2" WXGA 1024x600 / Intel 950GM up to 64Mb VRAM / Fast Ethernet 10/100 / Wireless 802.11bg / Webcam 1.3Mpx / 3-in-1 Card Reader / Windows 7 Starter EM / Weight 1.2kg with 6-cell battery

Rp. 2.999.000,0

Download Mozilla Firefox 3.6

Download Mozilla Firefox by Click Here

Download Winrar 3.20

Download winrar by click here

Change Administrator Password By CMD

Sometimes when we install windows xp,we forgot the administrator password. Or, when in the net or in the Lab school if you want to break the administrator password can be done by passing the CMD (Command Prompt). here is how to change password :

1. Press Windows + R or START-> RUN
2. Type 'cmd' and hit enter
3. Type net (space) user (space) administrator (space) yourpassword and enter the password will be changed according to what you want. For example: net user administrator abcd, then hit enter. then the administrator password will be immediately replaced into abcd.
4. Or you can type net(space)user(space)administrator(space)*, and press enter. then will appear word "Type the password for the user : " Type your password here. Then press enter, retype again and enter. your password will change.

so easy to change the administrator password without having to know the real password. good luck ......^_^

How We Know What Type of Our Motherboard..

When we buy new computer or second computer but we lost the CD driver, of course we will be having trouble finding drivers for our motherboard. Some motherboards do have device drivers that "plug n play", meaning that when completed the install, all direct drivers to function properly. But if not? Of course we will be confused to find our motherboard drivers if its any kind of motherboard you do not know.


Here, some tips to determine what type of motherboard or determine the type of device driver to us:

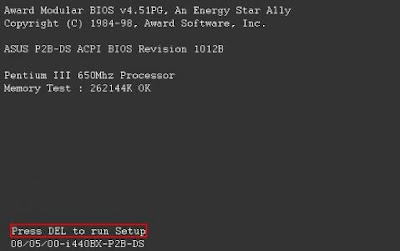
1. Turn on your computer, so the computer reads "BEP" quickly press a button Pause - Break on the keyboard. Display monitor will be as below.


Look in the lower left corner, below the words "Press DEL to run Setup". It type of our motherboard. We find these types P2B motherboard we are using the chipset i440BX. Write on paper, or memorized. Searching on Google to find the driver.

Another way to know type of our motherboard is open dxdiag on the windows.
START->RUN->Type "dxdiag" or Windows + R and type dxdiag
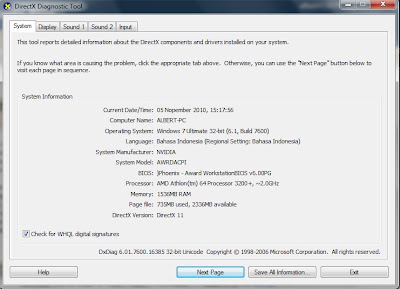
then will be appear specification of your computer like a RAM,Processor,Sound,Video,Motherboard,operating system, and your input devices. look a picture below :


look at System Manufacturer : NVIDIA and System Model : AWRDACPI
its mean your motherboard type is NVIDIA AWRDACPI. you can search your driver motherboard with google with keyword "NVIDIA AWRDACPI"

Wednesday, September 15, 2010

Download Video From Youtube

Many people watching video in youtube. How we can download it video? I will Explain How to Download video in youtube using IDM(Internet Download Manager). It's easy..
First, make sure the browser you use is Mozilla Firefox. if you don't have mozilla , you can download here

Install Mozilla Firefox on your computer.
Second, You can Download Internet Download Manager here
After that, install IDM(Internet Download Manager) on your computer. and restart Firefox so the Internet Download Manager can appears on Firefox like in the picture below..


Easy right? after you stream the video, click download link, and Internet download manager will download automaticly... This post hopefully can help :)

Sunday, July 4, 2010

Write HTML in HTML

Confused want to display HTML tags in posts? Here I will explain how to create html tags in HTML. Replace some HTML script like the one below:

1. "<" Replaced by "&lt;",
2. ">" Replaced by "&gt;",
3. "&" Replaced by "&amp;",
4. "quotes 2" Replaced by "&quot;",
5. "±" Replaced by "&plusmn;",
6. "Spasi" Replaced by "&nbsp;",
7. "©" Replaced by "&copy;",
8. "®" Replaced by "&reg;".

look after your result, your HTML script will appear in your posts.
This article hopefully useful ^.^

Create Link in Blog

If you create an article for the post, then in his want of make a link, say the article talks about a business that you follow on a website on the internet, then you want the article invites readers to visit websites that you describe. Suppose that in the article, there are words like your "If you are interested please click here", well to make a link from the words please follow the following steps:


1. Block the words you want in the created link, the example above is
click here.

2. Click on the icon picture like this which is located on the toolbar, then after that will appear in a new window http:// writings are shaped like the image below:


3. Fill in the text box that appears with a website address you want, for example: http://facebook.com

4. Click OK. Finish

Create Links with new window

Maybe you have thoughts, if you make a reader clicks on a link then, you worry that our blog visitors will leave our blog. To minimize the problem, can be done by making the new window, so when a visitor clicks on one link that we make, we do not blog pages are crushed with a new page but what happens is that your blog page still exist and new pages will appear at the click separately. When you click it, it will generate a new window. To create a link like this can be done by way of:
1. If already do I create a link like the above description, click on the Edit HTML tab on the toolbar.

2. In earlier writings we link will display the code like this (writing samples click here in links to facebook.com :

<a href="http://facebook.com">Click Here</a>

So here you have to add a frill HTML code target = "new" or target = "_blank" at the beginning or end of code. Example of code that has been in the modification are:

<a href="http://facebook.com" target="new">Click Here</a>

or :

<a href="http://facebook.com" target="_blank">Click Here</a>


Please try, hopefully useful ^_^


Create Web Visitor in Blog

Creating timers are common visitors at the show in many websites, and in fact how very easy because many free services that provide the facility.
What is Web Counter visitor counter or automatic?
Web counters are additional applications on the web or blog that serves as a counter of visitors who visit our blog. This counters the workings of all kinds, ranging from counting page views to unique Visitor.

Well if you already know what I mean and interested to make it on the blog or

Websites you please follow the steps below:

1. Open website http://www.wowcounters.net
2. Then Click Link ** Click Here to Sign Up for your Free Counter ** available on the Website
3. Then the appropriate Form Fill your personal data and select a Style and Sign Up
4. Then Copy the HTML Code and apply it on your blog, by way of the Layout menu -> Page elements and then add a page elements continue to select the HTML / Java Script

Easy enough right? if you want to try using other web because http://www.wowcounters.net felt less attractive in terms of graphical display automatic timers, please visit some of the web address below:

Sites that provide Counter and Statistics Blog:
1.http://www.easycounter.com
2.http://sitemeter.com
3.http://blogaja.com
4.http://hitstats.com
5.http://oggix.com

Good Luck..

Regedit Tips

Here,, I'd like to explain to edit registry on your windows.I suggest you use deepfreeze, before edit your registry system. here, I use windows xp as my operating system, in other Operating system maybe there are a little difference.first. click start->Run or press Win+R on your keyboard, and type Regedit, and enter. regedit windows will appear.
and edit the regedit as you wish..


Disable CMD
HKCU \ Software \ Microsoft \ Windows \ CurrentVersion \ Policies \ System
Create a new Dword with a name "DisableCMD" Then fill valueX with:
1 = Command
2 = Command & Script

Creating Different Views On Logon Window

HKEY_USERS / .DEFAULT / Software / Microsoft / Windows / CurrentVersion / ThemeManager
ColorName double click and enter text in the Value Data Metallic.

Displaying the Administrator on Welcome Screen
HKEY_LOCAL_MACHINE \ SOFTWARE \ Microsoft \ Windows NT \ CurrentVersion \ Winlogon \ SpecialAccounts \ Userlist
Create a new DWORD Value and name the new administrator.
Double-click Administrator and enter the first digit in the Value Data.

Auto Login
HKEY_LOCAL_MACHINE / SOFTWARE / Microsoft / Windows NT / CurrentVersion / Winlogon
AltDefaultUserName double click and enter your user account selected.
AutoAdminLogon double click and enter the number 1 in Value Data.
Create a new DWORD Value and give name DefaultPassword.
DefaultPassword double click and enter the account password is selected in the Value Data.

Hiding Printers & Faxes Icon from Start Menu
HKEY_CURRENT_USER / Software / Microsoft / windows / CurrentVersion / Explorer / Advanced
Find a value named Start_ShowPrinters and give the number 0 in Value Data.

Renaming the Recycle Bin
HKEY_CLASSES_ROOT / CLSID / (645FF040-5081-101B-9F08-00AA002F954E)
Double click on the option (Default value) and give a new name as desired on the Value Data.

Hiding Recycle Bin
HKEY_LOCAL_MACHINE / Software / Microsoft / Windows / CurrentVersion / Explorer / Desktop / NameSpace
Delete subkey (645FF040-5081-101B-9F08-00AA002F954E), then Restart the computer to see results.
To bring it back, make the re-combination of numbers (645FF040-5081-101B-9F08-00AA002F954E).

Return the lost Documents Folder In My Computer
HKEY_LOCAL_MACHINE / Software / Microsoft / Windows / CurrentVersion / Explorer / DocFolderPaths
Select Edit menu> New> String Value and name it in accordance with the username that is used in Windows (eg: Chippers)
Double click on these values and enter the path where your Documents to be (for example D: \ Documents)

Hide My Recent Documents
HKEY_CURRENT_USER / Software / Microsoft / Windows / CurrentVersion / Policies / Explorer
Click the Edit menu> New> DWORD Value and give name NoRecentDocsMenu.
Then double click on DWORD Value, and give a number to activate it.

Hide Menu Find
HKEY_CURRENT_USER / Software / Microsoft / Windows / CurrentVersion / Policies / Explorer
Click on Edit menu> New> DWORD Value and give name NoFind.
Then double click on DWORD Value and give a number to activate it. Restart the computer.

Hide Help And Support
HKEY_CURRENT_USER / Software / Microsoft / Windows / CurrentVersion / Policies / Explorer
Create a new DWORD Value - Menu Edit> New> DWORD Value, and name NoSMHelp.
Then double click on NoSMHelp and fill with 1 in Value Data. Restart the computer.

Hide Run Menu
HKEY_CURRENT_USER / Software / Microsoft / Windows / CurrentVersion / Policies / Explorer
Create a new DWORD Value and give name NoRun. Double click and enter the number 1 as the Value Data.

Hiding Menu Run From the Start Menu (2)
HKEY_CURRENT_USER / Software / Microsoft / Windows / CurrentVersion / Explorer / Advanced
Find a value named Start_ShowRun, double click and enter the number 0 in the Value Data.

Hiding Log Off
HKEY_CURRENT_USER / Software / Microsoft / Windows / CurrentVersion / Policies / Explorer
Click the Edit menu> New> Binary Value and name NoLogOff.
Double click on NoLogOff and enter the number 01 00 00 00 in the Value Data.

Hiding Menu Turn Off Computer
HKEY_CURRENT_USER / Software / Microsoft / Windows / CurrentVersion / Policies / Explorer
Click the Edit menu> New> DWORD Value and name NoClose.
Double click NoClose and give value 1 in Value Data.

Hiding the Control Panel from the Start Menu
HKEY_CURRENT_USER / Software / Microsoft / Windows / CurrentVersion / Explorer / Advanced
Find a value named Start_ShowControlPanel and double click on the section.
Enter the number 0 in Value Data.

Hide menu My Pictures From the Start Menu
HKEY_CURRENT_USER / Software / Microsoft / Windows / CurrentVersion / Explorer / Advanced
Double click on Start_ShowMyPics and enter the number 0 in the Value Data.

Return the Administrative Tools Menu

HKEY_CURRENT_USER / Software / Microsoft / Windows / CurrentVersion / Explorer / Advanced
Double click on StartMenuAdminTools and give the value 1 in Value Data.

Minimize Start Menu Icons
HKEY_CURRENT_USER / Software / Microsoft / Windows / CurrentVersion / Explorer / Advanced
Double click on Start_LargeMFUIcons and insert value 1 in Value Data.

Eliminating Username On the Start Menu
HKEY_CURRENT_USER \ Software \ Microsoft \ Windows \ CurrentVersion \ Policies \ Explorer
Select Edit> New> DWORD Value and name NoUserNameInStartMenu.
Double click NoUserNameInStartMenu and insert value 1 in Value Data.
Prevent Start Menu Changes
HKEY_CURRENT_USER / Software / Microsoft / Windows / CurrentVersion / Policies / Explorer
Create a new DWORD Value and give name NoChangeStartMenu.
Double click NoChangeStartMenu and insert value 1 in Value Data.

Create Desktop More Stable
HKEY_CURRENT_USER / Software / Microsoft / Windows / CurrentVersion / Explorer
Create a new DWORD Value and give name DesktopProcess.
Double click DesktopProcess and insert value 1 in Value Data.

Deleting a List of Courses In Home Run
HKEY_CURRENT_USER / Software / Microsoft / Windows / CurrentVersion / Explorer / RunMRU
In the right pane, you will see a row of the software (indicated by the alphabet a, b, c, d, and so on).
To remove it, simply by selecting one (or all) the name of an existing program and press the Del key.
If a confirmation window pops up for data deletion, tap Yes.

Disabling Right-click the Desktop
HKEY_CURRENT_USER / Software / Microsoft / Windows / CurrentVersion / Policies / Explorer
Create a new DWORD Value and give name NoViewContextMenu.
Double click on NoViewContextMenu and insert value 1 in Value Data.

Change the Time Delay When Opening Menu
HKEY_CURRENT_USER / Control Panel / Desktop
Double click on the MenuShowDelay and change the number that originally 400 milliseconds into other figures. The smaller the faster.

Set Size Icon On Desktop And Start Menu
HKEY_CURRENT_USER / Control Panel / Desktop / WindowMetrics
Double-click the Shell Icon Size and change the number 32 to another number, say 10.

Changing Windows Color
HKEY_CURRENT_USER / Control Panel / Colors
Double-click the window and enter the RGB color combination (use Adobe PhotoShop to find the appropriate color combination).

Changing Text Colors in Windows
HKEY_CURRENT_USER / Control Panel / Colors
Double click WindowText and enter the RGB color combinations.

Removes the Screen Saver tab
HKEY_CURRENT_USER / Software / Microsoft / Windows / CurrentVersion / Policies / System
HKEY_LOCAL_MACHINE / Software / Microsoft / Windows / CurrentVersion / Policies / System
Create a new DWORD Value and give name NoDispScrSavPage.
Double click NoDispScrSavPage and insert value 1 in Value Data.

Changing the Screen Saver with Registry
HKEY_CURRENT_USER / Control Panel / Desktop
Double click SCRNSAVE.EXE then enter the path where the file desired Screen Saver.
Example: C: \ WINDOWS \ ScreenSaver.scr

Disabling Default Screen Saver
HKEY_USERS / .DEFAULT / Control Panel / Desktop
Double click ScreenSaveActive and enter the number 0 in Value Data.
To return insert value 1 in Value Data.

Eliminating arrow on Shortcut icon
HKEY_CLASSES_ROOT / Inkfile
HKEY_CLASSES_ROOT / piffile
Change the name IsShortcut be IsShortcuts.

Change Style Wallpaper
HKEY_CURRENT_USER / Control Panel / Desktop
Double click on WallpaperStyle and enter the following number in the Value Data:
1> Center
2> Stretch
3> Tile

Turning off Low Disk Space Warning
HKEY_CURRENT_USER / Software / Microsoft / Windows / CurrentVersion / Policies \ Explorer
Create a new DWORD Value and give name NoLowDiskSpaceChecks.
Double click NoLowDiskSpaceChecks and insert value 1 in Value Data.

Disabling Menu Properties My Computer
HKEY_CURRENT_USER / Software / Microsoft / Windows / CurrentVersion / Policies / Explorer
Create a new DWORD Value and give name NoPropertiesMyComputer.
Double click NoPropertiesMyComputer and insert value 1 in Value Data.
HKEY_LOCAL_MACHINE / Software / Microsoft / Windows / CurrentVersion / Policies / Explorer
Create a new DWORD Value and give name NoPropertiesMyComputer.
Double click NoPropertiesMyComputer and insert value 1 in Value Data.
If the Explorer key does not exist, create a new one by clicking on the Edit menu> New> Key and name it Explorer.

Sizing CoolSwitch
(Try to press Alt Tab, it is called with CoolSwitch)
HKEY_CURRENT_USER / Control Panel / Desktop
HKEY_USERS / .DEFAULT / Control Panel / Desktop
Click CoolSwitchColumns and arrange CoolSwitch how long it will be displayed by entering the desired number in the Value Data.
Then click CoolSwitchRows and do similar things.

Disabling Function CoolSwitch
HKEY_CURRENT_USER / Control Panel / Desktop
HKEY_USERS / .DEFAULT / Control Panel / Desktop
Double click on CoolSwitch and enter the number 0.

Changing Keys Left to Right Buttons On Mouse
HKEY_CURRENT_USER / Control Panel / Mouse
Double click on SwapMouseButtons and give the value 1 in Value Data.
Changing Line Rolls On Scroll Mouse
HKEY_CURRENT_USER / Control Panel / Desktop
Double click WheelScrollLines enter the desired number (in accordance with the line you want rolled) in Value Data.

Hiding the System Properties Control Panel
HKEY_CURRENT_USER / Control Panel / don 't load
Make a new String Value and give name sysdm.cpl.
Double click sysdm.cpl and insert 'Yes' in the Value Data.

Disabling Display Properties
HKEY_CURRENT_USER / Software / Microsoft / Windows / CurrentVersion / Policies
On the Policies subkey, create a new key with the way Edit> New> Key and name it System.
Then in the System subkey, create a new DWORD Value and give name NoDispCPL.
Double click NoDispCPL and insert value 1 in Value Data.

DVDs In Windows Media Player
HKEY_CURRENT_USER / Software / Microsoft / MediaPlayer / Player / Settings
Select Edit menu> New> String Value and name DVDUI.
Double click DVDUI and enter the text Yes in Value Data

Hiding Drive
HKEY_CURRENT_USER / Software / Microsoft / Windows / CurrentVersion / Policies / Explorer
Select Edit> New> DWORD Value and name NoDrives.
Double-click the drive NoDrives and determine which one to be eliminated in the Value Data.
Example: if you want to remove drive E:, enter the number 16 in the Value Data.
Combination of numbers in the Value Data is as follows:

A: 1 D: 8 G: 64 J: 512 M: 4096
B: 2 E: 16 H: 128 K: 1024 All: 67108863
C: 4 F: 32 I: 256 L: 2048

Hiding Advanced Settings In Windows Explorer Folder Options
HKEY_LOCAL_MACHINE / SOFTWARE / Microsoft / Windows / CurrentVersion / Explorer
Under key Explorer will find subkey named Advanced. Right click and select Rename. Advanced Rename become Advancedx.

Code Playing Game Cheating Hearts
HKEY_CURRENT_USER / Software / Microsoft / Windows / CurrentVersion / Applets
Click the Edit menu> New> Key and name the Hearts.
Click the Edit menu> New> String Value and give name and fill in the numbers ZB 42 in Value Data.
Open Hearts in the Start Menu> All Programs> Games. After entering the name of the player, press the following button combination:
Ctrl + Shift + Alt + F12 and all the cards will open.

Clean Trash Uninstall
HKEY_LOCAL_MACHINE / SOFTWARE / Microsoft / Windows / CurrentVersion / Uninstall
Delete the subkey that has the same name as the package is uninstalled.

Removing Unwanted Programs List From Add / Remove Programs
HKEY_LOCAL_MACHINE \ SOFTWARE \ Microsoft \ Windows \ CurrentVersion \ Uninstall
Delete the subkey that contains the unwanted program by pressing the Del key.

Running Programs At Startup
HKEY_LOCAL_MACHINE / SOFTWARE / Microsoft / Windows / CurrentVersion / Run
Select Edit menu> New> String Value with the name of Winamp for example.
Double click on the value and enter the path where the program is installed (C: \ Program Files \ Winamp \ winamp.exe)

Speeding up Windows XP Shutdown Process
HKEY_LOCAL_MACHINE / SYSTEM / CurrentControlSet / Control
WaitToKillServiceTimeout Double click and change the value to be lower than 2000.

Changing the AM and PM Be Morning And Evening
HKEY_CURRENT_USER / Control Panel / International
Double click s1159 and change the text AM with MORNING.
Double click s2359 and change the text PM with AFTERNOON.

Disabling Autorun Function
HKEY_CURRENT_USER / Software / Microsoft / Windows / CurrentVersion / Policies / Explorer
Double-click NoDriveTypeAutoRun, and insert number 95 in the Value Data.

Turning off Automatic Program Not Responding
HKEY_USERS / .DEFAULT / Control Panel / Desktop
Double click AutoEndTasks and insert value 1 in Value Data.

Changing the Internet Explorer Toolbar Background
HKEY_CURRENT_USER / Software / Microsoft / Internet Explorer / Toolbar
Select Edit menu> New> String Value and name BackBitmap.
Double click BackBitmap and fill with the path where the bitmap image (. Bmp) that will become the toolbar background is in the Value Data.
For example: C: \ WINDOWS \ Wallpaper.bmp

Tweaking Memory In Windows XP
HKEY_LOCAL_MACHINE / SYSTEM / CurrentControlSet / Control / SessionManager / Memory Management
Double click on DisablePagingExecutive and insert value 1 in Value Data.
If enabled, Windows will not make the paging file to your hard disk. The operating system and programs become more responsive. Recommended for computers that have more than 128MB of memory.
Double click on LargeSystemCache and insert value 1 in Value Data.
When activated, the system will allocate the entire memory (except 4 MB for disk caching) to file caching. The computer will do the XP kernel caching in memory so that Windows XP can run faster.

Unload. Etc. To Accelerate Access Memory
HKEY_LOCAL_MACHINE \ SOFTWARE \ Microsoft \ Windows \ CurrentVersion \ Explorer
Select Edit menu> New> Key and name the AlwaysUnloadDLL.
In the Default Value option enter the number 1.

Hide the Device Manager
HKEY_CURRENT_USER / Software / Microsoft / Windows / CurrentVersion / Policies
Select Edit menu> New> Key and name it System.
In the System subkey create a new DWORD Value and give name NoDevMgrPage.
Double click NoDevMgrPage and insert value 1 in Value Data.

Optimizing your Computer Hard Disk When Idle Condition
HKEY_LOCAL_MACHINE \ SOFTWARE \ Microsoft \ Windows \ CurrentVersion \ OptimalLayout
Create a new DWORD Value and give name EnableAutoLayout.
Double click EnableAutoLayout and insert value 1 in Value Data.

Disabling Task Manager
HKEY_LOCAL_MACHINE \ Software \ Microsoft \ Windows \ CurrentVersion \ Policies \ System
Create a new DWORD Value and name it DisableTaskMgr.
Double-click DisableTaskMgr and insert 1 in Value Data.

Disabling Function CD Burning
HKEY_CURRENT_USER \ Software \ Microsoft \ Windows \ CurrentVersion \ Policies \ Explorer
HKEY_LOCAL_MACHINE \ Software \ Microsoft \ Windows \ CurrentVersion \ Policies \ Explorer
Create a new DWORD Value and give name NoCDBurning.
Double click NoCDBurning and insert value 1 in Value Data.

Modify the Start Menu Folders
HKEY_CURRENT_USER \ Software \ Microsoft \ Windows \ CurrentVersion \ Explorer \ Advanced
Create a new DWORD Value if it is not available and give name, among others Start_ShowControlPanel, Start_ShowMyComputer, Start_ShowMyDocs, Start_ShowMyMusic, Start_ShowMyPics and Start_ShowNetConn.
Start_ShowControlPanel - Control Panel
Start_ShowMyComputer - My Computer
Start_ShowMyDocs - My Documents
Start_ShowMyMusic - My Music
Start_ShowMyPics - My Pictures
Start_ShowNetConn - Network Connections
Double click on each key and give the option value as follows:
0 = Hidden
1 = Open When clicked
2 = Expand Contents

Hide All Programs From Start Menu
HKEY_CURRENT_USER \ Software \ Microsoft \ Windows \ CurrentVersion \ Policies \ Explorer
HKEY_LOCAL_MACHINE \ Software \ Microsoft \ Windows \ CurrentVersion \ Policies \ Explorer
Create a new DWORD Value and give name NoStartMenuMorePrograms.
Double click NoStartMenuMorePrograms and insert value 1 in Value Data.

Hiding Computer Management Option (Right click on My Computer Manage menu)
HKEY_CURRENT_USER \ Software \ Microsoft \ Windows \ CurrentVersion \ Policies \ Explorer
Create a new DWORD Value and give name NoManageMyComputerVerb.
Double click NoManageMyComputerVerb and insert value 1 in Value Data.

Prohibition On Active Desktop
HKEY_CURRENT_USER \ Software \ Microsoft \ Windows \ CurrentVersion \ Policies \ ActiveDesktop
HKEY_LOCAL_MACHINE \ Software \ Microsoft \ Windows \ CurrentVersion \ Policies \ ActiveDesktop
Create one or several DWORD Value with the name as follows:
NoChangingWallpaper - Disable the ability to change wallpapers.
NoComponents - Disable components.
NoAddingComponents - Disable the ability to add components.
NoDeletingComponents - Disable the ability to delete components.
NoEditingComponents - Disable the ability to edit components.
NoCloseDragDropBands - prevents adding, dragging, dropping and closing the Taskbar's toolbars.
NoMovingBands - retrict adjustments to the desktop toolbars
NoHTMLWallPaper - only allow bitmaps (BMP) as wallpaper
and enter the number 1 on each Value Data.

Prohibiting Change Active Desktop Settings
HKEY_CURRENT_USER \ Software \ Microsoft \ Windows \ CurrentVersion \ Policies \ Explorer
HKEY_LOCAL_MACHINE \ Software \ Microsoft \ Windows \ CurrentVersion \ Policies \ Explorer
Create a new DWORD Value and give name NoActiveDesktopChanges.
Double click NoActiveDesktopChanges and insert value 1 in Value Data.

Disabling the Folder Options Menu
HKEY_CURRENT_USER \ Software \ Microsoft \ Windows \ curre ntVersion \ Policies \ Explorer
HKEY_LOCAL_MACHINE \ Software \ Microsoft \ Windows \ Curr entVersion \ Policies \ Explorer
Create a new DWORD Value and give name NoFolderOptions.
Double click NoFolderOptions and insert value 1 in Value Data.

Viewing Processor Information
HKEY_LOCAL_MACHINE \ HARDWARE \ DESCRIPTION \ System \ CentralProcessor
Note: Only to be seen and not for editing.

Disabling Internet Access
HKEY_CURRENT_USER \ Software \ Microsoft \ Windows \ CurrentVersion \ Internet Settings
Create a new DWORD Value if it is not available, and name each ProxyEnable and ProxyServer.
Double click ProxyEnable and enter insert value 1 in Value Data.
Double click ProxyServer and insert input in the form of fake proxy address, for example: 127.0.0.1:1271
HKEY_CURRENT_USER \ Software \ Policies \ Microsoft \ Internet Explorer \ Control Panel
Create two new DWORD Value and give name of each Connwiz Admin Connection Settings and Lock.
Double click each value and insert value 1 in Value Data.

Disabling Function Download Files In Internet Explorer
HKEY_CURRENT_USER \ Software \ Microsoft \ Windows \ CurrentVersion \ Internet Settings \ Zones \ 3
HKEY_LOCAL_MACHINE \ Software \ Microsoft \ Windows \ CurrentVersion \ Internet Settings \ Zones \ 3
Create a new DWORD Value if it is not available, and give the name of 1803.
Double-click 1803 and enter the number 3 in the Value Data.

Prohibit Instalation Program Through ActiveX in Internet Explorer
HKEY_CURRENT_USER \ Software \ Microsoft \ Windows \ CurrentVersion \ Internet Settings \ Zones \ 3
Create a new DWORD Value if no, and name in 1001.
Double click 1001 and insert desired input as the following in the Value Data:
1 = Enabled Prompt Installations
3 = Installations Disabled

Eliminate the option "Show hidden files & folders" on Folder Options
HKEY_LOCAL_MACHINE | SOFTWARE | Microsoft | Windows | CurrentVersion | Explorer | Advanced | Folder | Hidden
In the bag. "Type" remove the word "group"
OS: WIN XP

Tuesday, June 22, 2010

Create ReadMore in Blogger

Here I will explain how to create Readmore on bloggers, as we know, if there is no read more, then your blog will be a long and sloppy, I create one by editing the html in your template, and add a script on posts you've written. way quite easily. first go to 'draft' and select 'edit html'

after that you download the template first before adding the script, by selecting 'Download full Template', then select the location where you want to backing up template.

The next check list "Expand Widget Templates", like the one in the picture below:


then input this script above <head>

<style>
<b:if cond='data:blog.pageType == "item"'>
span.fullpost {display:inline;}
<b:else/>
span.fullpost {display:none;}
</b:if>
</style>


and search

<p><data:post.body/></p> or <data:post.body/>

with Ctrl + F on your browser.
then, add the script just below that :

<b:if cond='data:blog.pageType != "item"'>
<a expr:href='data:post.url'> Read More..</a>
</b:if>


"Readmore" word can be replaced in accordance with your wishes, can be replaced with a "Continue Reading" or up to you.

The first step is completed. next to the tab "Settings", select "Format". then the entry box template, fill in the script as follows:

<span class="fullpost">

</span>

Then click on "Save Settings", With This setting, if you want create new post, the text above will appear automaticlly.

Now Try edit your post, and add the script below :

<span class="fullpost">


where you'll cut your post, and became Readmore. and at the end of the post, you add this script:

</span>

maybe this way is a bit complex, but with this blog we'll be able to become more orderly. one another. if you want to change the template again, then you must edit the html on the template just by means of the above. okay?

good luck ^ ^

Monday, June 21, 2010

Create category in blogger

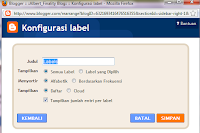
How to create categories on our blog is very easy, first login to your blog in blogger, then go to "POST" and "EDIT entry", posting a post that you have been here, to create a category, posting a checklist that you want to make as category, then select "Label Actions," and select "New Label"
Give the name of the label you want to make, then select OK.

Take a look as shown below:


Next step is to add a gadget "label" on your blog. go to "DESIGN", and Select "Page Element", here you can set your blog, right places and you can also add gadgets to your liking,
Select 'Add Gadget', then the new tab will appear, select the Label and Select the "+" to add the gadget to your blog, it looks like this:
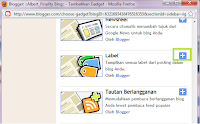


give the name of the label, it's up to you. then adjust the settings according to what you want. and Select Ok to create a Category,

Then Look at your blog now, there will be categories in your blog. If the picture is less great, just click to see more clearly.
good luck:)

Sunday, June 20, 2010

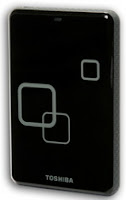
Canvio, 1 TB External Hard Drive from Toshiba


After the presence of an external hard drive 640GB My Passport Studies from Western Digital which is regarded as the largest capacity hard drive, now the position is shifted by Toshiba. Toshiba makes portable hard drive with capacity 1TB Canvio, and measures 3.1 inches wide, 4.7 inches long and 0.65 inch thick, weighs just 3.6 oz.
Canvio Toshiba portable hard drive has a USB 2.0 port that works for power and data connections.

However, unfortunately this has not suppoer hard drive USB 3.0 port, offering greater speeds than USB 2.0. If the My Book from Western Digital Passport is aimed at Mac users, then this Canvio intended for PC users. Toshiba is also adding new devices to help PC users to backup data with ease, because the hardware is equipped also softwareNTI BackupNow EZ, and search capability also restore the data if there are files missing.

For PC users who have advanced, the software also features a choice Canvio backup, and overwrite the original file. Canvio provides a complete backup system, allow a user to restore the computer system when the system can not start. Toshiba external hard drive this Canvio given three-year warranty and comes in five colors, namely Raven Black, Satin Silver, Liquid Blue, Rocket Red, and Green dragons. For this 1TB version Canvio sold with price range of $ 200.

Asus Netbook PC 1015PE, Can Hold Up to 13.5 Hours


Asus has added a new mode for the Eee PC family. Two new model called Eee PC and 1015PE 1015P. Both models into the platform supports the Pine Trail and battery life up to 13.5 hours. Asus has included the operating system Windows 7 Starter Edition in both the laptop and one reason for long battery life is the presence of 6-cell 63Wh battery pack.

While the Intel Atom chip Pine View to integrate graphics and memory control in one place in the second netbook. Design temperature rating of the chip power is 5.5 Watts and able to maintain a longer battery life for several hours. Asus Eee PC mini laptop 1015PE 1015P and also support Wi-Fi 802.11n, Bluetooth 2.1, VGA connector, three USB 2.0 ports, LAN port, 0.3 megapixel webcam, multi-media card reader, Stereo Speakers with Hi-Definition Audio CODEC and also Mic.

Asus Netbook PC 1015PE 1015P and was entered into the model and support Seashell display 10.1-inch WSVGA LED Backlight, and a screen resolution of 1024x600 pixels. Asus equip both models with a 1.66GHz Intel microprocessor Pine View-M N450 and storage on the web as much as 500GB Asus. For battery life up to 13.5 hours, asus add 6 cell Li-Ion battery with certain settings. The difference between the two models and 1015PE 1015P PC netbook is on the color and design. However, there has been no detailed official price of the Asus.

Seagate Momentus XT, World's Fastest Hard Drive Hybrid


Seagate has announced a 5.2-inch Momentus drives XT claimed the fastest in the world. Notebook Asus Republic of Gamers (ROG) G73Jh The new Momentus hard drive is packaged with this XT. Seagate Momentus hybrid hard drive is used for laptop XT and promising performance like Solid State Drive, also features both between SSD and HDD. This hybrid hard drives will run 80 percent faster than the speed 7200RPM hard drive.

Seagate Momentus XT has a SLC-based SSD and has 32MB of DDR 3 memory cache. This HDD has a platter for maximum storage (250GB, 320GB or 500GB), together with a small SLC-based SSD for faster access speeds. Adaptive Technology Memory can use the information in flash memory for fast access.

Because it has a 4 GB SSD SLC NAND in it, Momentus hard drives can boot OS XT 100 times faster than 5400 RPM hard drive. The disk drive has a rotation speed of 7200 rpm and offers a 3 Gb / s with Native Command Queuing. This hybrid hard drive will be used in notebook Asus ROG G73Jh who has a mobile processor Intel Core i7-720QM to 8GB of DDR3 RAM and ATI Mobility Radeon HD 5870 in it.

Microsoft Office 2010 and the advantages


Microsoft Office scheduled to be launched in 2010 in Indonesia this month along with other applications in it. In passing, Office 2010 interface is not significantly different from Office 2007. A feature called the Navigation Pane, allowing users to view the summary of search results (search) are displayed in a single document pane and just click if you want to access one of them.
System Navigation Pane also facilitate setting up and working to make documents or writings such as when writing a book that consists of several chapters. Navigation Pane can display it in the form of a list describing the contents of the entire book, so if there are any errors, users can directly help to find errors that will be corrected. Navigation Pane already exists in Microsoft PowerPoint and Microsoft's Word 2010 are generally the same. The difference, in the Power Point slide show form page by page, while in Microsoft Word 2010 is shown in only one box to the left.

One advantage of this Microsoft Word 2010 users can connect with each other so that they can share the job efficiently. Additionally, the process of recovering the document in Word 2010 is also better able to display the files that are stored as easily forgotten when opening the file as normal.

Other features like picture editing and word text effects. By clicking on picture editing facilities then there are several options that could beautify the image either of color or form automatically. Then there is word text effect which will allow users to give various effects on the writings of, among other effects, such as newspapers and so forth. There is the Convert feature, which can change the file format of Word 2003 or 2007 can be automatically opened in Word 2010.

10 latest features of Microsoft Office 2010 :
Microsoft Office 2010 Beta version, you can now download on MSDN and TechNet. Here are some new features of Microsoft Office 2010.

1. Save Documents
With Microsoft Office 2010, you can directly upload documents to the Windows Live SkyDrive account and access it from another computer. SkyDrive provides 25 GB of online storage for free, because these services are integrated with Office Web Apps. You can view and edit these documents anywhere in a web browser without requiring Microsoft Office (even on a Mac).

2. Insert a web video in your presentation
With Office 2010, you can easily add video clips from the Internet into your PowerPoint presentations as Flash video in regular web pages. The trick is easy, just copy the embed code from YouTube (or other video sharing site) and paste it anywhere on the slide.

3. Quick Steps in Outlook
Gmail includes a feature "Send and Archive" a multi-tasking. When you click this button, the first time will send a reply and then tersipan as archives with just one click. With the new feature "Quick Steps in Outlook", you can use any Outlook items with a single click. In addition to "Send and Archive", as another example is a quick step to "Send and Delete", this feature will delete the email from your inbox after you mereply your email.

4. Creating PDF files
All Office 2010 programs have a feature "built-in PDF writer" is to help you save a document to PDF format by simply clicking on the feature.

5. Print document
With Office 2010, Microsoft has changed the dialog box to print the document and it was a remarkable improvement. For example, you can set the printer (such as page margins, etc.) and see the changes per page

6. Slideshows in PowerPoint Broadcast
This is probably the favorite features of PowerPoint 2010. You can give a live presentation via the web in PowerPoint and anyone in the world can view your presentation using a web browser.

7. Editing Video in PowerPoint
Do you want to cut some parts of the video clips for use in your presentation? Or do you want such reflection combined with 3D rotation so that audiences stay glued to your presentation? Well, it's easy because PowerPoint 2010 now, video editing features are also available

8. Slides as a video distribution
PowerPoint 2010 can turn your presentation into a video file formats that you can upload to YouTube or distribute on portable media players like iPods.

9. Built-in Screen Capture
All Office 2010 programs are now available screen clipping utility. This device will automatically take screenshots of all open applications on your desktop (not including applications diminimize) and you can enter it directly into your documents or presentations.

10. Outlook gets social
When you open an email message in Outlook 2010, will display relevant information such as file attachments, pictures, meeting requests, and all previous email messages that may be exchanged with others (like Xobni).


There are two important things before you install Office 2010, namely:

1. If you installed Office 2010 beta for the first time, the default settings will upgrade your Microsoft Office. But you can adjust these settings, and installed Office 2010, together with previous Office versions.
2. If you already have a Technical Preview of Office 2010 on your computer, make sure you completely uninstall this issue before trying to install Office 14 beta. Usually you will find it hard to install Office therefore use the cleanup utility to remove all traces of previous versions of Office from your system.

Thin Laptops via Toshiba T200 Series


Toshiba has officially announced the new laptops are thinner and lighter named T200 series that supported low-power processors, coupled with the relatively affordable price tag in the United States. Both 13.3-inch laptops announced T235 T215 11.6-inch satellites and satellites. Both laptops powered Fusion Chrome finish, with the cover re-design on the outside and is available in red, white and hitam.Ukurannya only one inch thin and weighs less than four pounds, making it a good traveling companion. This laptop prices start at $ 469.99 and will be available June 20 to come to the big retailers.

The technical specifications of the T200 series notebooks are as follows:

T215:
• 11.6-inch display
• AMD Athlon II Neo single or dual-core processor options
• ATI integrated graphics
• up to 320GB of storage
• 2GB of DDR3 RAM
• HDMI port
• Built-in webcam

T235:
• 13.3-inch display
• ATM Athlon II Neo, Neo Turion II, or ULV Intel Pentium dual-core processors
• 320GB hard drive
• 4GB of DDR3 RAM
• HDMI port
• Built-in webcam

First 3D Laptop from Lenovo, Y560d


PC maker Lenovo on Thursday (17/06) yesterday announced the first laptop designed for gamers and 3D users who want to watch HD movies. Lenovo IdeaPad 15.6-inch screen has Y560d, 3D glasses and software to create a more interactive notebook. Previously, ASUS has announced two 3D notebook display earlier this month with 15.6 inches and 17.3 inches. In addition, last year announced an Acer laptop with a 15.6-inch 3D screen. However, implementation has been slow because of this laptop3D to its price and lack of buyer interest. But Lenovo laptop hoping that it will take off as most 3D content is already available.

LenovoY560d laptop comes with Intel Core i7 processor and ATI Radeon HD5730 graphics card made by Advanced Micro Devices. A port HDMI (high-definition multimedia interface) to connect a laptop to game consoles, set-top box and TV. Laptops, which has a storage capacity of 750GB hard drives and 8GB of RAM, also has a built-in stereo system also exists in this new Lenovo laptop. Notebook LenovoY560d adopts TriDef 3D technology, which can take a normal 2D content like movies and displays them in 3D. LenovoY560d laptop device is sold with prices ranging from U.S. $ 1,199.99, including 3D and glass panels. This laptop will be available worldwide in late June.

Sunday, June 13, 2010

Create a Secret Folder

How to create a password for your folder? so another people that open your folder must input the password that you created. This is the step by step :

1. Create a new folder and open the notepad (start->run->type "notepad")
2. Then Copy this Code to notepad:

@ECHO OFF
title Folder Private
if EXIST "Control Panel.{21EC2020-3AEA-1069-A2DD-08002B30309D}" goto UNLOCK
if NOT EXIST Private goto MDLOCKER
:CONFIRM
echo Are you sure you want to lock the folder(Y/N)
set/p "cho=>"
if %cho%==Y goto LOCK
if %cho%==y goto LOCK
if %cho%==n goto END
if %cho%==N goto END
echo Invalid choice.
goto CONFIRM
:LOCK
ren Private "Control Panel.{21EC2020-3AEA-1069-A2DD-08002B30309D}"
attrib +h +s "Control Panel.{21EC2020-3AEA-1069-A2DD-08002B30309D}"
echo Folder locked
goto End
:UNLOCK
echo Enter password to unlock folder
set/p "pass=>"
if NOT %pass%== PASSWORD HERE goto FAIL
attrib -h -s "Control Panel.{21EC2020-3AEA-1069-A2DD-08002B30309D}"
ren "Control Panel.{21EC2020-3AEA-1069-A2DD-08002B30309D}" Private
echo Folder Unlocked successfully
goto End
:FAIL
echo Invalid password
goto end
:MDLOCKER
md Private
echo Private created successfully
goto End
:End

3. Change "PASSWORD HERE" to your password. and Save File in notepad as type "AllFiles", and Filename "secret.bat". you can change the file name as you like, that extensions must be ".bat"

4. Double click Secret.bat, then will appear folder private in your folder.

5. Copy Files that you want to hide in folder private, then double click again secret.bat and type "y" for lock the folder private. then your file in folder private can't be opened.
6. To Open the folder, double click secret.bat and input the password that you type before. then your folder will appear and can be opened.

Just in case, Hide the secret.bat. so another people doesn't know by right click at secret.bat, and choose properties. and checklist the Hidden, then OK.
and go to control panel and choose Folder option. on tab "View" choose "Don't show hidden files and Folders" then click ok.

Your secret.bat was hidden.. to open them you must go to folder options on tab "View" choose "Show Hidden Files and Folders" then ok. your secret.bat is visible. doble click on it. and input the password..
with this your file will be safety.
:)

Hide Important File to Image File

How to Hide Important File to Image file? If you won't your file is open by another person. You can hide it to image file, I will explain How to hide it using notepad. this is the step :

1. first, setting your windows to display extension file, go to control panel then double click Folder Option, then go to tab "Views" then remove the checkmark wit option "Hide extensions for known file types"

2. Prepare your Secret files (file extension is up to you), for example the file name is "Secret_video.avi" and have a image file with extensions *bmp,*jpg,*gif. for example albert.jpg, then save this two files at one directory.

3. change the secret_video.avi to secret_video.rar with right click at secret_video.avi and choose [Add to “secret_video.rar”], that Will create a new file with the name secret_video.rar

4. Now open the notepad ( Start->Run and type notepad )the copy this scripts :

@echo off
ren secret_video.rar secret_video.avi.rar
copy /b albert.jpg+secret_video.avi.rar finish.jpg
del secret_video.avi
del albert.jpg
del secret_video.avi.rar
del hide.bat

Remember!
Customize the names of the files on the script above with the name of your file (unless hide.bat)
finish.jpg is a image file that you used to hide secret files later. you can change by yourself. adjust with the scripts above.


save the file as a hide.bat with "all files" type at same location with your files before.

5. Close all open programs window. Now open the folder where you store all the files before. and double click Hide.bat that was created before. Wait until the flash of shadow windows command processor to appear. If successful, all the files in that folder will be lost is replaced with a new file named finish.jpg.

Try Open the finish.jpg. Glance will not make any difference with yours albert.jpg file unless the file sizes are getting bigger. You can still open the file with the Picture Editor or your favorite Image Viewer.

To open your secret files is easy. just right click on finish.jpg. the open with winrar. then your file will be opened by winrar.
GOOD LUCK ^^

Program C++


This is simple program that I created about borrowing books at Library with rental date and return date. I use Microsoft Visual Studio C++ for this coding. Okay this is the coding :


#include
#include
#include
#include
#include
void garis()
{
for(int a=0;a<60;a++)
{cout<<"=";}
cout<}
void gotoxy(int x,int y)
{ HANDLE hConsoleOutput;
COORD dwCursorPosition;

cout.flush();
dwCursorPosition.X =x;
dwCursorPosition.Y =y;
hConsoleOutput=GetStdHandle (STD_OUTPUT_HANDLE);
SetConsoleCursorPosition (hConsoleOutput,dwCursorPosition);
}

void main()
{ ulang:
int a1=0,a2=0,a3=0,a4=0,bayar,pil,total=0,item1,item2,item3,item4,al=0,st=0,ksi=0,pti=0;
int item11=0,item22=0,item33=0,item44=0;
char nama[15],penyewa[15],lagi;
int tgl,tgl2,bln,buku;
cout<<"Nama Perpustakaan : ";
cin>>nama;
cout<<"Nama Penyewa : ";
cin>>penyewa;
do
{ gotoxy(26,3);
cout<<" ";
gotoxy(0,3);
cout<<"Masukan Tanggal(1-31) : ";
cin>>tgl;
}
while(tgl<1||tgl>31);

do
{ gotoxy(26,4);
cout<<" ";
gotoxy(0,4);
cout<<"Masukan Bulan(1-12) : ";
cin>>bln;
}
while(bln<1||bln>12);

if(bln==2&&tgl>28)
{ tgl=28;}

do
{ system("cls");
cout< cout<<"Tanggal Peminjaman : "< cout<<"Buku-buku yang tersedia pada perpustakaan ini :"< garis();
cout<<"kode buku"< garis();
cout<<"1.AL"< cout<<"2.ST"< cout<<"3.KSI"< cout<<"4.PTI"< cout<<"5.Selesai Memilih.."< garis();
a1=0;
a2=0;
a3=0;
a4=0;
cout<<"Masukan nomor buku yang ingin di sewa ( pilih 5 untuk selesai memilih):";
cin>>pil;

switch(pil)
{
case 1:
{ if(item11==3)
{ cout<<"Buku yang anda Pilih sudah habis...!!"< <<"Silahkan Pilih Buku Lain.."< getch();
break;
}
else
{ cout<<"buku yang anda pilih algoritma, tarif Rp.10.000."< cout<<"Berapa item :";
cin>>item1;
item11+=item1;
if(item1>3)
{ item1=3;}
al+=item1;
a2=10000*item1;
total+=a2;
break;
}
}
case 2:
{ if(item22==4)
{ cout<<"Buku yang anda Pilih sudah habis...!!"< <<"Silahkan Pilih Buku Lain.."< getch();
break;
}
else
{ cout<<"buku yang anda pilih Struktur data, tarif Rp.15.000."< cout<<"Berapa item :";
cin>>item2;
item22+=item2;
if(item2>4)
{ item2=4;}
st+=item2;
a2=15000*item2;
total+=a2;
break;
}
}
case 3:
{ if(item33==2)
{ cout<<"Buku yang anda Pilih sudah habis...!!"< <<"Silahkan Pilih Buku Lain.."< getch();
break;
}
else
{ cout<<"buku yang anda pilih Konsep sistem informasi, tarif Rp.25.000."< cout<<"Berapa item :";
cin>>item3;
item33+=item3;
if(item3>2)
{ item3=2;}
ksi+=item3;
a3=25000*item3;
total+=a3;
break;
}
}
case 4:
{ if(item44==5)
{ cout<<"Buku yang anda Pilih sudah habis...!!"< <<"Silahkan Pilih Buku Lain.."< getch();
break;
}
else
{ cout<<"buku yang anda pilih PTI, tarif Rp.5.000."< cout<<"Berapa item :";
cin>>item4;
item44+=item4;
if(item4>5)
{ item4=5;}
pti+=item4;
a4=5000*item4;
total+=a4;
break;
}
}
default:
break;

}
buku=al+st+ksi+pti;
tgl2=(buku*2)+tgl;
}
while(pil!=5);

cout<<"nama penyewa : "< cout<<"Buku yang di pinjam :"< <<"AL"< <<"ST"< <<"KSI"< <<"PTI"< cout<<"Total Harga"< cout<<"Uang yang Di bayarkan : ";
cin>>bayar;
cout<<"Uang Kembali"< cout<<"Lama Peminjaman : "< cout<<"Dari Tanggal : "<
if(tgl2>31&&bln==1)/*januari*/
{ cout<<"Tanggal Pengembalian : "< else if(tgl2>28&&bln==2)/*februari*/
{ cout<<"Tanggal Pengembalian : "< else if(tgl2>31&&bln==3)/*maret*/
{ cout<<"Tanggal Pengembalian : "< else if(tgl2>30&&bln==4)/*april*/
{ cout<<"Tanggal Pengembalian : "< else if(tgl2>31&&bln==5)/*mei*/
{ cout<<"Tanggal Pengembalian : "< else if(tgl2>30&&bln==6)/*juni*/
{ cout<<"Tanggal Pengembalian : "< else if(tgl2>31&&bln==7)/*juli*/
{ cout<<"Tanggal Pengembalian : "< else if(tgl2>31&&bln==8)/*agustus*/
{ cout<<"Tanggal Pengembalian : "< else if(tgl2>30&&bln==9)/*september*/
{ cout<<"Tanggal Pengembalian : "< else if(tgl2>31&&bln==10)/*oktober*/
{ cout<<"Tanggal Pengembalian : "< else if(tgl2>31&&bln==11)/*november*/
{ cout<<"Tanggal Pengembalian : "< else if(tgl2>31&&bln==12)/*desember*/
{ cout<<"Tanggal Pengembalian : "< else
{ cout<<"Tanggal Pengembalian : "<ulang2:
cout< cin>>lagi;

if(lagi=='y')
{ system("cls");
goto ulang;
}
else if(lagi=='n')
exit(lagi);
else
goto ulang2;

}

just copy this coding to Microsoft Visual Studio C++, and start the program..
I am sorry if there are a weakness from this simple program,,
good luck :)